


Did you know Focaccia dates back to ancient Rome and was known as panis focacius, meaning “health bread?”
This bread is rich from the olive oil and still light in texture. Our favorite is topped with thinly sliced garlic cloves and
chopped rosemary.

If you’re new to fresh milled flour or unsure what this is, here is some more information to help you get started!
This post may contain affiliate links, please see our privacy policy for details.
What better way to enjoy a bread already coined as “health bread” than to utilize whole grain, fresh milled flour in your recipe!
You can even make it into a piece of art!
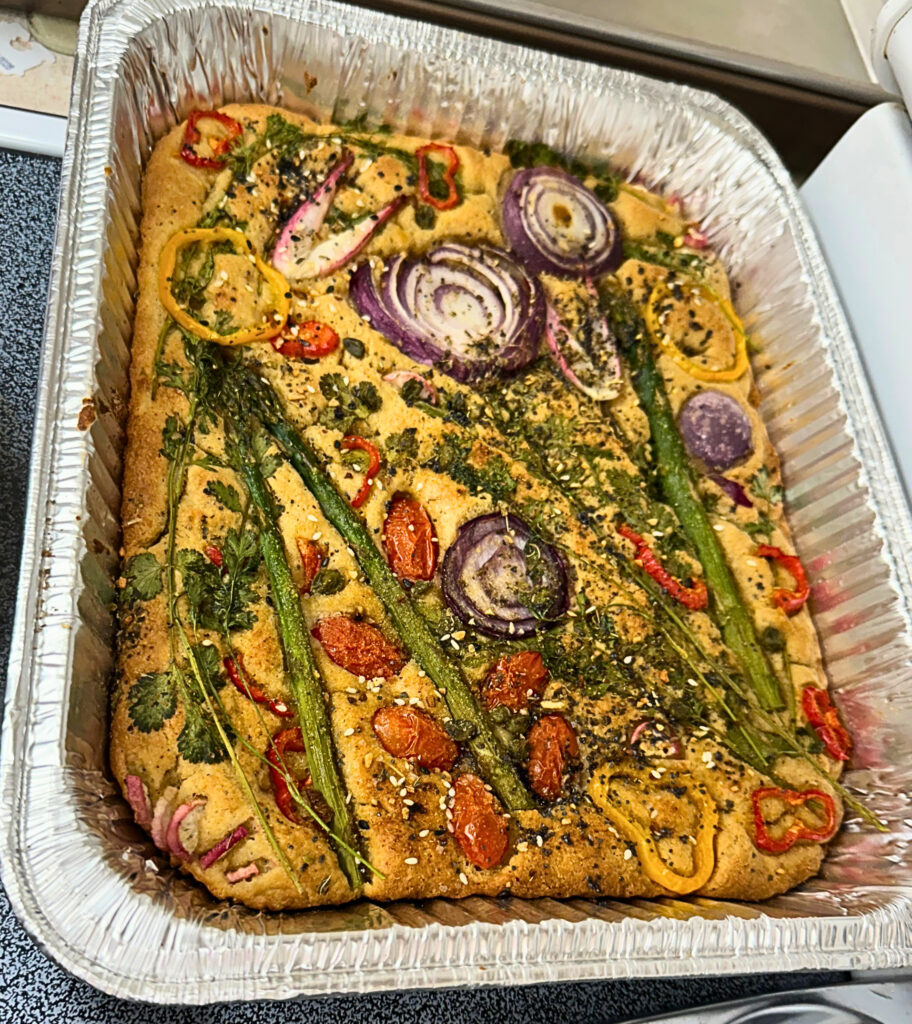
Table of Contents
Equipment needed to make Focaccia Bread
- Grain Mill
- Stand Mixer
- Digital Scale
- Measuring spoons
- Measuring cups
- Parchment Paper
- Pastry Brush
- 9″x13″ pan
Everything listed above can be found in, Shop my kitchen!
Ingredients for Focaccia
Bread
- Hard White Wheat Berries & Khorasan (Kamut Wheat)-You can use any variety here. We like this ratio of hard to soft grains. It provides the structure needed but softens the texture and provides great flavor.
- Yeast-Instant or dry active
- Honey-You can substitute maple syrup
- Salt–Redmond’s Real salt is all I use!
- Water
- Olive Oil
Toppings
- Garlic
- Fresh Rosemary, Thyme, Basil, Parsley or other herbs
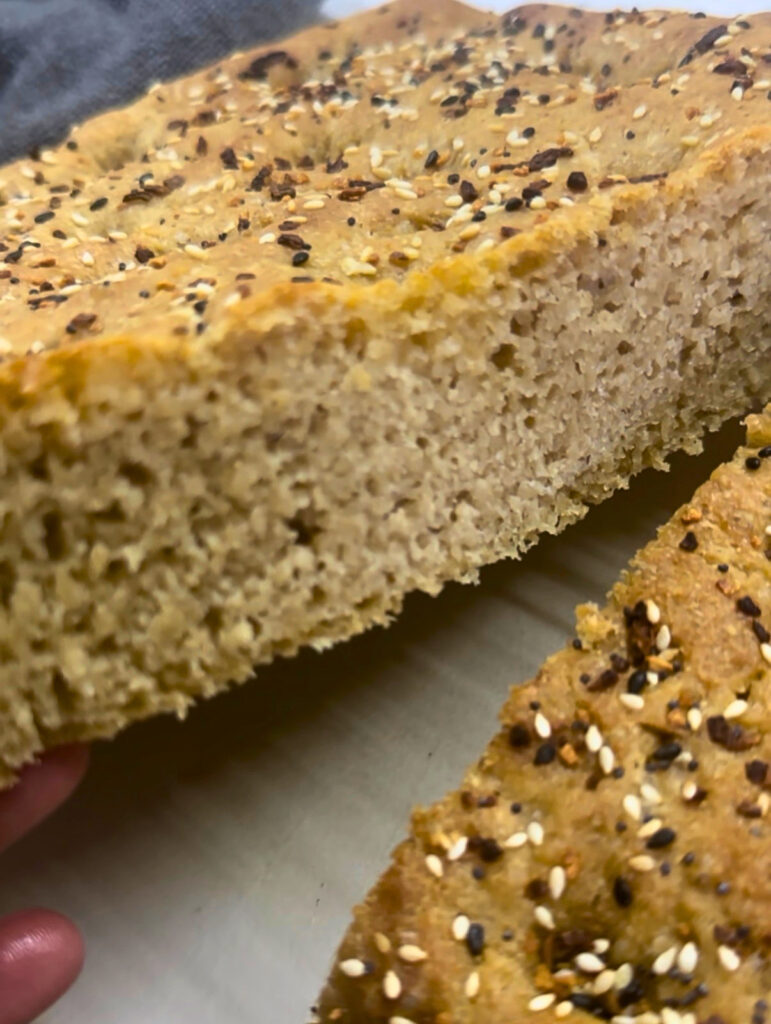
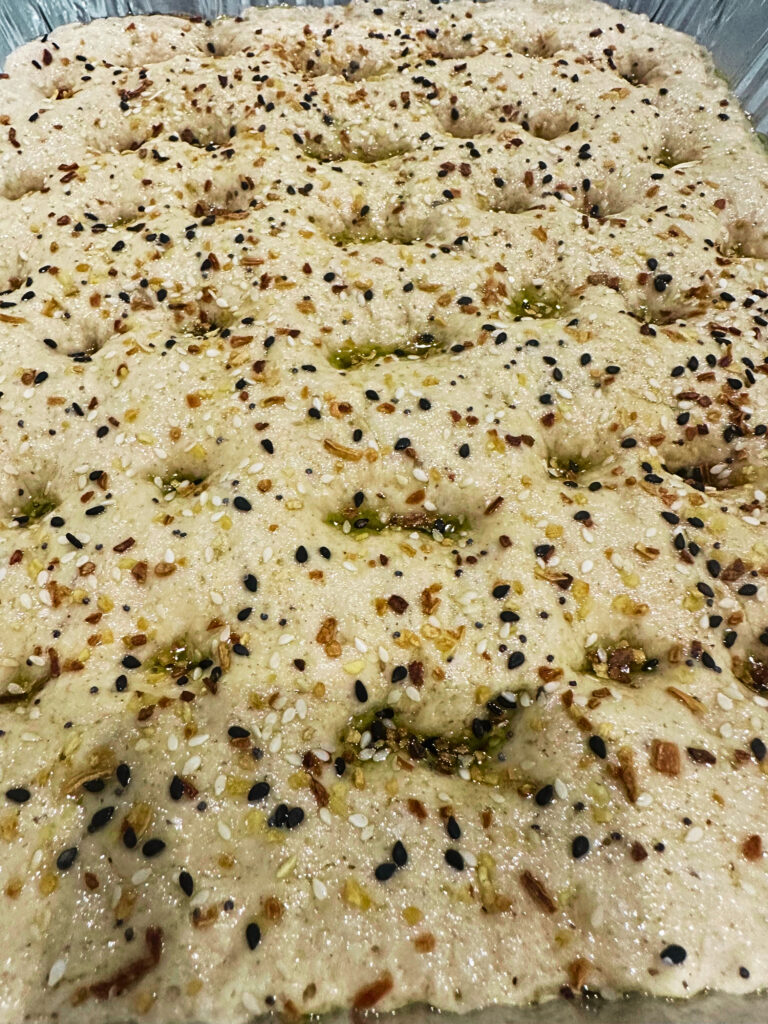
- Everything Bagel seasoning
- Fresh veggies: Green onions or chives, asparagus, sliced tomatoes, bell peppers, purple onions and more!
- Breakfast bread: Cooked bacon or sausage!
How to make Focaccia Bread
Instructions
- Mill your hard white wheat and Khorasan wheat berries into flour.
- Place your water, olive oil and honey in a small saucepan on the stove to warm. Heat just until your honey is melted. NOT HOT
- To the bowl of a stand mixer, add the flour, salt and warm liquid. Mix just until all flour is moistened. Let autolyse for 20 minutes.
- After the 20 minute autolyse, add the yeast to your bowl and begin mixing. If using the Ankarsrum mixer, fit with the roller and scraper. You can use the dough hook on other style stand mixers.
- Mix for 6-8 minutes until the dough begins to pull away from the sides and form a ball.
- Cover and proof for 1 hour or until the dough has doubled in size.
- I will even make this the day before and allow to bulk ferment in the refrigerator in an airtight container for 12-18 hours.

- After the dough has risen for 1 hour, it is time to shape and add to your 9″x13″ pan.
- Line your pan with parchment paper, coming up the sides as well.
- Drizzle olive oil to coat the parchment paper.
- Place your dough into the lined pan and stretch to fill the pan evenly.
- Lightly drizzle more olive oil on top of your dough and brush on with a pastry brush to coat.
- Using your fingers, work your dough out to the edges of the pan and leave indentions in the dough approximately an inch apart, covering the entire surface of the dough.
- Cover with plastic wrap and allow dough to proof for 30 minutes while you preheat oven to 400 degrees F.
- Before baking, top with desired toppings and be sure any fresh herbs and veggies are coated with oil so they will not burn.
- Bake at 400 degrees F for 20 minutes, rotating halfway through if needed.
**If you allowed your dough to bulk ferment overnight in the refrigerator, press dough into pan, and allow to proof for 2 hours instead of just the 30 minutes recommended above.

Classic Focaccia
Ingredients
Yeast Dough
- 700 grams Hard White Wheat
- 220 grams Khorasan (Kamut) Can sub other soft grain
- 4 tsp instant yeast
- 2 Tbsp honey
- 4 Tbsp olive oil
- 708 g water 3 cups
- 1 Tbsp salt
Optional toppings
- 4 Tbsp olive oil divided, coat pan and brush on top
- 3-4 sprigs Rosemary chopped
- 3 cloves garlic sliced thin
- Any fresh veggies to create art
Instructions
Yeast Dough
- Mill your hard white and Khorasan (Kamut) wheat berries into flour.
- Place your water, olive oil and honey in a small saucepan on the stove to warm. Heat just until your butter is melted. NOT HOT
- Mix for 6-8 minutes until the dough begins to pull away from the sides and form a ball.
- Cover and proof for 1 hour or until the dough has doubled in size.** I will even make this the day before and allow to bulk ferment in the refrigerator in an airtight container for 12-18 hours.
- After the dough has risen for 1 hour, it is time to shape and add to your 9"x13" pan.
- Line your pan with parchment paper, coming up the sides as well.
- Drizzle olive oil to coat the parchment paper. Use a pastry brush to spread evenly if needed. Approx 2 Tbsp
- Place your dough into the lined pan and stretch to fill the pan.
- Lightly drizzle more olive oil on top of your dough and brush on with a pastry brush to coat.
- Using your fingers, work your dough out to the edges of the pan and leave indentions in the dough approximately an inch apart, covering the entire surface of the dough.
- Cover with plastic wrap and allow dough to proof for 30 minutes while you preheat oven to 400 degrees F.
- Before baking, top with desired toppings and be sure any fresh herbs and veggies are coated with oil so they will not burn.
- Bake at 400 degrees F for 20 minutes, rotating halfway through if needed.
- Serve warm.
- Reheat in the oven for 5 minutes if cooled and you are wanting to serve at a later time.
- Store covered on the counter for up to 3 days.
Notes
Nutrition
Frequently asked questions about Focaccia Bread
Can I make this ahead of time?
This dough happens to be one of the most resliant recipes I have ever found. I will make the dough ahead of time and allow to bulk ferment in the refrigerator. I have even frozen the dough, placed in the fridge the night before and baked the following day. It is very forgiving and with enough time to thaw and proof it bakes off very well.
Can I substitute sugar for honey?
If you would like to utilize an alternative sweetener, this recipe is written in grams, therefore you can swap the honey for a granular sweetener gram for gram.
Can I use this dough recipe for other baked goods?
This recipe is used in my Pesto Christmas Tree as well as pizza crust and fluffy dinner rolls! A version of the recipe with a few modifications, is used for my cinnamon roll recipe! Love the blend of grains in this one.
Tips and Tricks:
I like the flavor created by the longer bulk ferment in the fridge but it is not essential to the success of this recipe.
Try different toppings! My favorite is garlic and rosemary, but I have not had one I didn’t enjoy.


Fig Cake with Brown Butter Icing
THANK YOU!
Thank you so much for trying this recipe, I hope you love this Focaccia Bread as much as my family does. If you make this recipe, please share and tag me on Instagram orFacebook! And, please leave a comment or star rating below. I love to see everyone be successful in the journey to a healthier lifestyle with fresh milled flour! Don’t hesitate to contact me with any question, chances are we will both learn something from us working through it together!
Happy Baking!
Bailey Basics is a participant in the Amazon Services LLC Associates Program, an affiliate advertising program designed to provide a means for sites to earn advertising fees by advertising and linking to amazon.com. I may earn a commission, with no additional cost to you, if you purchase through those links.
Classic Focaccia Bread made with Fresh Milled Flour

This spin on the classic focaccia bread is made even better with the use of whole grains made into fresh milled flour.
Recipe Ingredients: