

Classic Bagels made with fresh milled flour
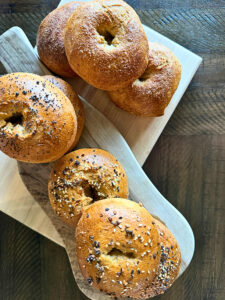
This classic recipe for bagels made with fresh milled flour and boiled in hot water creates a fluffy inside and chewy outside.
Recipe Video Name: Classic Bagels
Recipe Video Description: Learn how to make a classic, chewy bagel using fresh milled flour.
Recipe Video Thumbnail: https://youtu.be/HLYFV6ygpCY?si=sGbzoMIX1qHzn_-b
Recipe Ingredients:
I love Bagels with cream cheese and smoked lox or smeared with peanut butter! So when I worked to switch my kitchen over to Fresh Milled Flour, it was only the a matter of time before I converted my classic recipe over!
I love the blend of hard white wheat and Khorasan in this recipe. It give a light fluffy texture and a subtle chew from the boiled dough.
If you’re new to fresh milled flour, here are a couple of posts to get you started!


This post may contain affiliate links, please see our privacy policy for details.
Table of Contents
Fresh Milled Flour
Our family has been working to convert all of our recipes over to fresh milled flour, and finding alternatives to store bought, processed foods. We have experienced many changes to our health and have enjoyed the journey.
Fresh Milled Hard White Wheat makes this bagel hearty and nutrient dense. When utilizing the whole grain, you will harness the fiber, healthy fats, protein, minerals and vitamins that store bought flour lacks.
Ingredients needed for Classic Bagels
- Fresh Milled Hard White Wheat and Khorasan Wheat
- Sugar
- Salt
- Yeast
- Sunflower Lecithin
- Water
- Egg (for egg wash)
Equipment needed for Classic Bagels
- Grain Mill
- Stand Mixer
- Digital Scale
- Silicone Mat (optional)
- Bench Scraper
- Parchment Paper
- Pastry Brush
- Deep Cast Iron Skillet or Sauce Pan
How To Make Classic Bagels
These are surpisingly simple and easy to make for a weekday breakfast, sandwiches or afternoon snack.
Start by milling your wheat, I love my Nutrimill grain mill but there are a ton on the market today! You could substitute einkorn, hard red wheat or a blend for this recipe. I like the harder wheats as it provides a strong gluten structure in my bread products and then the Khorasan (Kamut) has a buttery flavor.
Add all of your ingredients (except the yeast) to a stand mixer fitted with a paddle (or roller attachment if you are using an Ankarsrum)
Mix just until the flour is wet and no dry ingredients are visible. Cover and allow to Autolyse for 20 minutes.
After the autolyse period, add the yeast to the mixer and mix for 6-8 minutes or until you are able to stretch the dough 4-6 inches between your fingers without it tearing. This is called a “window pane” test. It will let you know your gluten is developed and your dough is done being mixed.
Cover the bowl with plastic wrap and allow to proof for 1 hour or until it has doubled in size.
Next, divide the dough into 8 equal pieces, use a scale if needed.
I use these dough scrapers for removing bread from bowls, dividing dough and scraping counters! They are inexpensive and a lifesaver.


Next, shape your dough into balls by working your way around the outside of the dough ball pulling up and stretching to the center of the dough. Then flip the ball of dough over, and roll in a circular motion until you have a smooth top. Pinch the dough on the bottom to seal it off.
Next, take your forefinger and poke a hole in the center of the bagel. With the bagel on your pointer finger, twirl in a circular motion to open the center. Then add your other pointer finger and work in opposite directions to make the center hole even larger. Repeat with each of the 8 bagels.
Cover with a tea towel and allow to rest while you get your water ready to boil the bagels.
Preheat oven to 425 Degrees F.
In a deep skillet or a large sauce pan, fill with atleast 2″ of water and place on high heat on the stove.
When the water begins to boil, drop the bagels, top side down into the boiling water. I like to use my “kitchen tweezers” for these. Use the tweezers to twirl the bagel so it does not stick to the bottom of the pan if you are using a skillet.
Boil for 30 seconds on each side and then flip to the other side.


Remove from the boiling water and place on a parchment lined sheet pan.
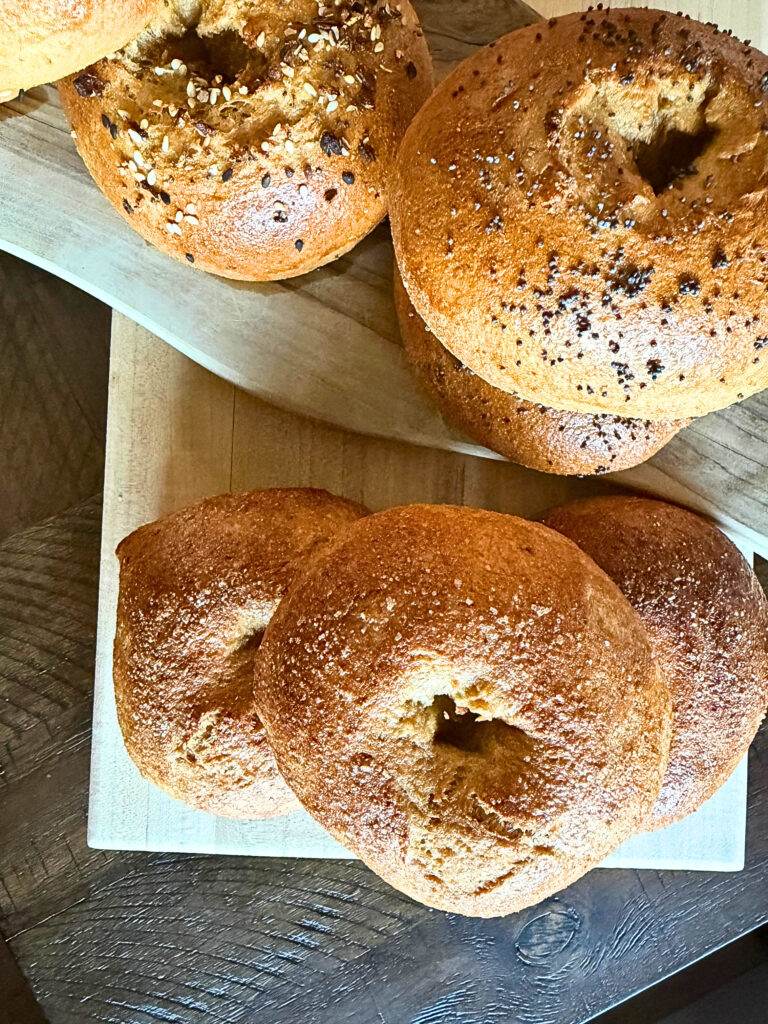
After all bagels have been boiled, brush on an egg wash. Sprinkle with desired toppings. I like: Everything Bagel Seasoning, Poppy Seeds, Asiago Cheese, Cinnamon Sugar and even just Plain!
Place bagels into the preheated oven for 20 minutes.
Once the bagels are cooked, allow to cool for 5 minutes and then move to a wire rack to allow them to cool completely.
Store in an air tight container on the counter for 3 days or the refrigerator for a week! These also freeze well and can be stored for up to 3 months in the freezer.
Recipe – FAQ
How do I store these bagels?
These can be stored on the counter for 3 days, in the refrigerator for up to a week or the freezer for 3 months. Because these lack preservatives, you want to be careful to not expose your bagels to dirty hands or knives which will cause premature mold!
Do I add anything to my water when I boil the bagels?
No! Boiling water kills the yeast just on the exterior of the dough, causing it to gloss over and create a crust around the fluffy interior.
When can I split my bagels?
I like to split my bagels right before I eat them. I store them whole so they do not dry out. You do want to let them cool completely before slicing.
Classic Bagels
Equipment
- Cast iron skillet or sauce pan Must hold atleast 2" of water
Ingredients
- 350 g hard white wheat berries Extra for dusting counter-20 grams
- 150 g Khorasan, (Kamut) wheat berries
- 18 g Sugar
- 10 g Redmonds Real Salt
- 6 g Yeast dry active or instant
- 5 g Sunflower Lecithin Sub 1 egg yolk if you do not have
- 360 g Water Room temperature
Egg wash
- 1 egg
- 2 Tbsp water
Other topping options: Adjust amounts as needed based on your preferences
- 2 Tbsp Seasame seeds or poppy seeds
- 2 Tbsp Everything bagel sesasoning
- 2 Tbsp Cinnamon Sugar
Instructions
- Weigh and mill your wheat berries
- Mix just until the flour is wet and no dry ingredients are visible. Cover and allow to Autolyse for 20 minutes.
- Cover the bowl with plastic wrap and allow to proof for 1 hour or until it has doubled in size.
- Next, divide the dough into 8 equal pieces, use a scale if needed.
- Next, shape your dough into balls by working your way around the outside of the dough ball pulling up and stretching to the center of the dough. Then flip the ball of dough over, and roll in a circular motion until you have a smooth top. Pinch the dough on the bottom to seal it off.
- Next, take your forefinger and poke a hole in the center of the bagel. With the bagel on your pointer finger, twirl in a circular motion to open the center. Then add your other pointer finger and work in opposite directions to make the center hole even larger. Repeat with each of the 8 bagels.
- Cover with a tea towel and allow to rest while you get your water ready to boil the bagels.
- Preheat oven to 425 Degrees F.
- In a deep skillet or a large sauce pan, fill with atleast 2" of water and place on high heat on the stove.
- When the water begins to boil, drop the bagels, top side down into the boiling water. I like to use my "kitchen tweezers" for these. Use the tweezers to twirl the bagel so it does not stick to the bottom of the pan if you are using a skillet.
- Boil for 30 seconds on each side and then flip to the other side.
- After all bagels have been boiled, brush on an egg wash. Sprinkle with desired toppings. I like: Everything Bagel Seasoning, Poppy Seeds, Asiago Cheese, Cinnamon Sugar and even just Plain!
- Place bagels into the preheated oven for 20 minutes.
- Once the bagels are cooked, allow to cool for 5 minutes and then move to a wire rack to allow them to cool completely.
- Store in an air tight container on the counter for 3 days or the refrigerator for a week! These also freeze well and can be stored for up to 3 months in the freezer.
Video
Notes
Nutrition
THANK YOU!
Thank you so much for trying this recipe, I hope you love these Cottage Cheese Bagels as much as my family does. If you make this recipe, please share and tag me on Instagram or Facebook! And, please leave a comment or star rating below. I love to see everyone be successful in the journey to a healthier lifestyle with fresh milled flour! Dont hesitate to contact me with any question, chances are we will both learn something from us working through it together!
Happy Baking!
Bailey Basics is a participant in the Amazon Services LLC Associates Program, an affiliate advertising program designed to provide a means for sites to earn advertising fees by advertising and linking to amazon.com. I may earn a commission, with no additional cost to you, if you purchase through those links.
Bailey Basics is not a dietician or nutritionist, and any nutritional information shared is an estimate. If calorie count and other nutritional values are important to you, we recommend running the ingredients through whichever online nutritional calculator you prefer. Calories can vary quite a bit.
Other High Protein Recipes!


My go to recipe for fresh milled biscuits! Yum!
Thank you so much for your sweet words! I am glad you love it as much as our family does!
So delicious 💕. I love it with yogurt, or actually just by itself as a snack. The maple and vanilla…
The absolute BEST chocolate chip cookies!! My kids love them so much

I am so glad you enjoy them as much as our family!